Updating the BIOS on a Gigabyte motherboard is an essential process to enhance system stability, compatibility, and security. Here’s a detailed step-by-step guide:
Identify Your Motherboard Model
Visit Gigabyte’s official website and navigate to the support or downloads section. Enter the model name or use the provided tools to locate your motherboard model number. Ensure you download the correct BIOS update corresponding to your exact motherboard model and revision.
Download the BIOS Update
Once you’ve identified your motherboard model, download the latest BIOS update available for it. Save the BIOS update file to your computer. Ensure you save it in a location where you can easily locate it, like the desktop.
Prepare a USB Flash Drive
Insert a USB flash drive into your computer. Format the USB drive to the FAT32 file system. This ensures compatibility for BIOS update purposes.
Move BIOS Update to USB Drive
Copy the downloaded BIOS update file from your computer to the root directory of the USB flash drive. Do not place it inside any folders on the drive; it should be directly on the drive’s main directory.
Restart Your Computer
Restart your computer and enter the BIOS/UEFI setup. You can usually access this by pressing a specific key during the boot process, such as Del, F2, F12, or Esc, depending on your motherboard model. Check your motherboard manual for the exact key.
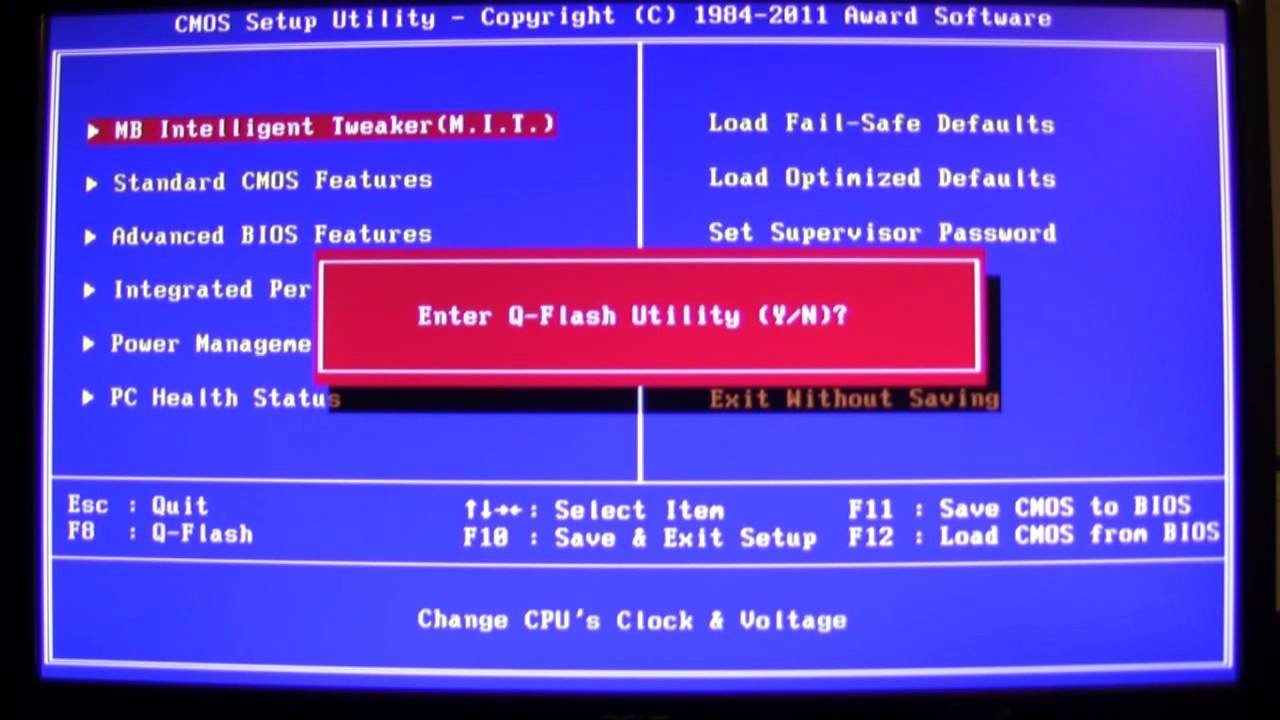
Access the BIOS Update Utility
Once inside the BIOS/UEFI setup, locate and select the “Q-Flash” utility. This tool allows you to update the BIOS using the USB flash drive.
Select BIOS Update Option
Within the Q-Flash utility, choose the option to update the BIOS from the USB flash drive. Navigate to the location where you saved the BIOS update file on the USB drive and select it.
Begin BIOS Update
Follow the on-screen instructions to confirm and initiate the BIOS update process. Be patient and allow the update to complete without interruption. Do not power off your computer or remove the USB flash drive during this process.
Reboot and Verify Update
Once the update process finishes, your system may automatically restart. Enter the BIOS/UEFI setup again and verify that the BIOS version has been updated to the new version.
Reset BIOS Settings (Optional)
If you encounter any issues or changed settings after the update, consider resetting the BIOS settings to default/factory settings within the BIOS/UEFI interface.
Final Thought:
Updating the BIOS on a Gigabyte motherboard can bring several improvements, but it’s crucial to follow the steps carefully and ensure you have the correct BIOS update for your specific motherboard model and revision. By executing these steps accurately, you can successfully update the BIOS, enhancing your system’s performance and compatibility.